Distance Approximation System for Blind in a Match Box Size

Me and other partners worked on the project for engineering design course (at Sulatan Qaboos University). The Idea of the course is to give the students the soft skill that are required on the field. Part of the course is that, the Doctor will play the role of the client and the students will get the requirements from him. Our requirement is to design a device the will help blind people to approximate distances and help them to avoid obstacles. After a few meeting we’ve came up with a design.The design was a device 35 mm x 50 mm x 20 mm , weigh less than 300 grams. To a Proximate distance we’ve used  Ultrasonic range finder Maxbotix LV-EZ0. The user interface is very easy. A vibration motor was used for system notifications. And headphone for distance notification (different beeps for different ranges ). The user interface is also consists of two buttons for volume control. Another button was used for multi-functions. A long press will switch on and off the system while short press will toggle the operation mode from indoor to outdoor and vise versa. The device also has the capability to detect if the headphone is plugged in or not or if it is defected. In that case, the vibrator will be active for few second indicating an error and then the device will be turned off to save power.

wholesys

The image above shows the circuit diagram of the whole system. The sub-circuit  “MULTIFUNCTIONAL” contain part of the circuit that will handle powering on and off the circuit and listing to the button as in put at the same time. The image below is the component inside  the sub-circuit.

multikey

The final implementation of the device is shown in the next image.

20130513_214819

demonstration video of the device .

Morse code Interpreter

We finally finished the embedded systems mini project, thank to Allah and  the team(Ali Al Lawati, Hamza Al Abri, and Sulaiman Al Habsi) work. The project is about design and implement a device that can hear a Morse code through a microphone and translate the to text. the text will be displayed on a 2×16 LCD screen, so the device can only translate 32 character [aA-zZ 0-9] at a time .We use an op-amp to amplify the sound signal, couple of capacitor  to filter out the some nasty frequencies and an ATMega8 as processing unit. The processing algorithm will be described later on, and it will be available as will as the source code of the project after presenting the project to the instructors.The device work perfectly with sound signal with frequency span of [1.2KHz – 1.5Khz],but it can be modified to work with and reasonable rang . A signal generated from this link is Ideal.

You can get the report with description and some of the code from REport

Here is a video show how the device work .

also here is some PCB layout we have designed for the project.

Using eclipse AVR application development plug in

In previous post you have seen how to install AVR plugin in eclipse IDE. In this post you are going to see how to use the plugin.  First of all you will need to create a new project. Go to menu bar and select “new” and from the submenu select “C Project”.

By expanding the folder “AVR cross target application “choose Empty Project” and “AVR-CGG toolchain” from the toolchain list .Type down the project’s name, and then hit next.

Here you can click on advance setting but that will be explained in a coming post, when we come to explain avr-dude. Anyway make sure that both list items are ticked and proceed to the next form.

Choose your microcontroller type and its clock frequency (this is similar to #define F_CPU 8000000UL) in WINAVR.

In the “Project Explorer” tab right click on your project and choose “New > Source File” from the pop up menu. Similar way you can add a header file or C class file. Type in the file name and you must type the file’s extension witch is “.c” in this case.

Write in your code ,note that if you press “ctrl” + ”space”  the IDE can suggest to you thing to write .Also there is some useful tab under the work space tab from these tabs you can see what are the supported register , ports and interrupts  for you MCU.

To compile your code you’ll need to save your work because eclipse will not save it for you. Then click on the small arrow near the hammer icon in the tools bar and choose “Debug” .The errors will be displayed in the problems tab and so the warnings . This will generate new folder in the project explorer bar called Debug. If you browse the folder you will notice that the hex file is not there yet, that’s because we haven’t built the project yet. To build the project tick on “Release”  from the same menu you clicked debug and new folder will be add to the project explorer called release and the contains the “.hex” file .

Eclipse IDE AVR application development plugin

While surfing for a great tutorial for embedded systems development in AVR-GCC website, I came across very interesting topic, so I said let’s give it a try. The post/article was about a plugin for eclipse IDE (integrated development environment) for developing AVR applications. The plug in is using avr-gcc to compile the projects so you still need to install WINAVR (I’m not sure). What is good about it is that, it can tell you about the error without compiling the code, nice code coloring, and it can suggest or predict syntax. Also you can easily configure your make file through a graphical user interface. Beside that you can directly burn your software to the chip as we will see in coming posts.

To install the plugin you’ll need to install a few things first. You’ll need eclipse IDE. Any one will work but if you are not Java developer you can download the C/C++ IDE directly. Also you will need to install CDT (C/C++ Development tool) plugin in your eclipse IDE.

figure1

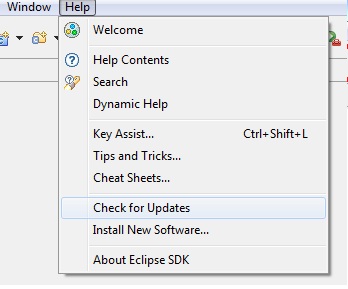
By clicking on help menu and choose “Install new software”.

Then click on “Add” and put anything on the Name field. Now copy one of these links in the location field depending on your eclipse.

for Eclipse Indigo               

http://download.eclipse.org/tools/cdt/releases/indigo

for Eclipse Helios

http://download.eclipse.org/tools/cdt/releases/helios

for Eclipse Galileo

http://download.eclipse.org/tools/cdt/releases/galileo

You may find that the link already exits, and in that case you can choose it from the dropdown menu labeled with “work with”. You can also download the plugin from here and to offline installation. After restarting you eclipse you will need to repeat the same steps to install the AVR plug in but from this link http://avr-eclipse.sourceforge.net/updatesite . Or you can download it and install it offline from here.

After restarting your eclipse you can see the AVR menu has been add to the menu bar and small AVR icon add to the development toolbar .

next post will be about using the plugin .